Wednesday, January 28, 2009

INSTALLATION SCREENSHOTS of the FOLLOWING OPERATING SYSTEM

1.1 Windows XP :

STEP:

1. Insert the Windows XP CD into your computer and restart your computer.

2. If prompted to start from the CD, press SPACEBAR. If you miss the prompt (it only appears for a few seconds), restart your computer to try again.


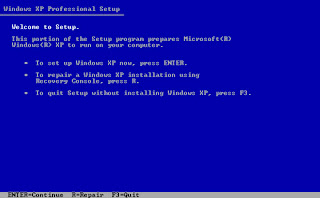
3. Windows XP Setup begins. During this portion of setup, your mouse will not work, so you must use the keyboard. On the Welcome to Setup page, press ENTER.


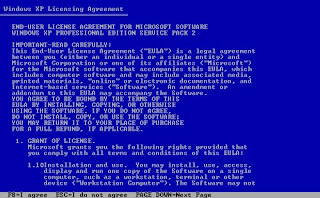
4. On the Windows XP Licensing Agreement page, read the licensing agreement. Press the PAGE DOWN key to scroll to the bottom of the agreement. Then press F8.


5. This page enables you to select the hard disk drive on which Windows XP will be installed. Once you complete this step, all data on your hard disk drive will be removed and cannot be recovered. It is extremely important that you have a recent backup copy of your files before continuing. When you have a backup copy, press D, and then press L when prompted. This deletes your existing data.

6. Press ENTER to select Unpartitioned space, which appears by default.
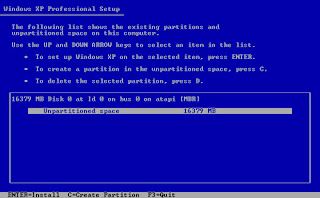


7. Press ENTER again to select Format the partition using the NTFS file system, which appears by default.
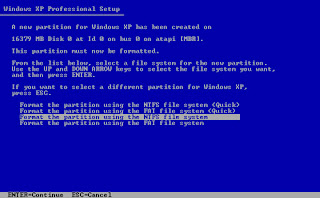


8. Windows XP erases your hard disk drive using a process called formatting and then copies the setup files. You can leave your computer and return in 20 to 30 minutes.
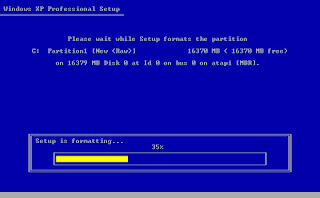


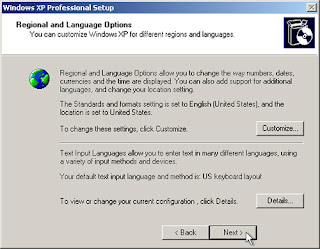
9. Windows XP restarts and then continues with the installation process. From this point forward, you can use your mouse. Eventually, the Regional and Language Options page appears. Click Next to accept the default settings. If you are multilingual or prefer a language other than English, you can change language settings after setup is complete.


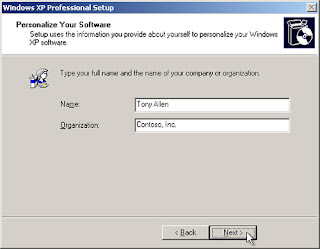
10. On the Personalize Your Software page, type your name and your organization name. Some programs use this information to automatically fill in your name when required. Then, click Next.


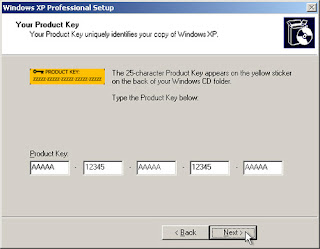
11. On the Your Product Key page, type your product key as it appears on your Windows XP CD case. The product key is unique for every Windows XP installation. Then, click Next.


12. On the Computer Name and Administrator Password page, in the Computer name box, type a name that uniquely identifies your computer in your house, such as FAMILYROOM or TOMS. You cannot use spaces or punctuation. If you connect your computer to a network, you will use this computer name to find shared files and printers. Type a strong password that you can remember in the Administrator password box, and then retype it in the Confirm password box. Write the password down and store it in a secure place. Click Next.


13. On the Date and Time Settings page, set your computer’s clock. Then, click the Time Zone down arrow, and select your time zone. Click Next.


14. Windows XP will spend about a minute configuring your computer. On the Networking Settings page, click Next.


15. On the Workgroup or Computer Domain page, click Next.


16. Windows XP will spend 20 or 30 minutes configuring your computer and will automatically restart when finished. When the Display Settings dialog appears, click OK.


17. When the Monitor Settings dialog box appears, click OK.


18. The final stage of setup begins. On the Welcome to Microsoft Windows page, click Next.


19. On the Help protect your PC page, click Help protect my PC by turning on Automatic Updates now. Then, click Next.


20. Windows XP will then check if you are connected to the Internet:

• If you are connected to the Internet, select the choice that describes your network connection on the Will this computer connect to the Internet directly, or through a network? page. If you’re not sure, accept the default selection, and click Next.


• If you use dial-up Internet access, or if Windows XP cannot connect to the Internet, you can connect to the Internet after setup is complete. On the How will this computer connect to the Internet? page, click Skip.


21. Windows XP Setup displays the Ready to activate Windows? page. If you are connected to the Internet, click Yes, and then click Next. If you are not yet connected to the Internet, click No, click Next, and then skip to step 24. After setup is complete, Windows XP will automatically remind you to activate and register your copy of Windows XP.


22. On the Ready to register with Microsoft? page, click Yes, and then click Next.


23. On the Collecting Registration Information page, complete the form. Then, click Next.


24. On the Who will use this computer? page, type the name of each person who will use the computer. You can use first names only, nicknames, or full names. Then click Next. To add users after setup is complete or to specify a password to keep your account private, read Create and customize user accounts.


25. On the Thank you! page, click Finish.


Congratulations! Windows XP setup is complete. You can log on by clicking your name on the logon screen. If you’ve installed Windows XP on a new computer or new hard disk drive, you can now use the File and Settings Transfer Wizard to copy your important data to your computer or hard disk drive.

After logon, take a few minutes to validate your copy of Windows. Validation gives you access to hundreds of free downloads from the Microsoft Download Center. To learn about the new features Windows XP provides, click the Start button, click All Programs, click Accessories, and then click Tour Windows XP.


1.2 VISTA

Step #1: Plan your installation

When you run the Windows Vista Setup program, you must provide information about how to install and configure the operating system. Thorough planning can make your installation of Windows Vista more efficient by helping you to avoid potential problems during installation. An understanding of the configuration options will also help to ensure that you have properly configured your system.

I won't go into that part right now (I might later this month, no promises...) but here are some of the most important things you should take into consideration when planning for your Windows Vista installation:

* Check System Requirements

* Check Hardware and Software Compatibility

* Determine Disk Partitioning Options

* Decide on a Workgroup or Domain Installation

* Complete a Pre-Installation Checklist

After you made sure you can go on, start the installation process.

Step #2: Beginning the installation process

You can install Windows Vista in several methods - all are valid and good, it all depends upon your needs and your limitations. In this manual I will focus on the simplest form of installation - directly from the Windows Vista DVD media.

More on other forms of installation can be found in the Windows Vista Information, Tweaking, Tips and Tricks section.

So, insert your Windows Vista DVD media into your DVD drive and reboot your computer. A black window will appear momentarily while the DVD content is read
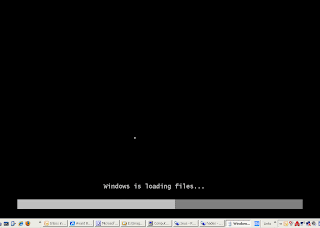


Step #3: The GUI-based portion of the Setup program

Unlike previous versions of Windows, Windows Vista does not have a noticeable text phase of the setup process, and it will boot directly into the Graphical User Interface (GUI) mode.

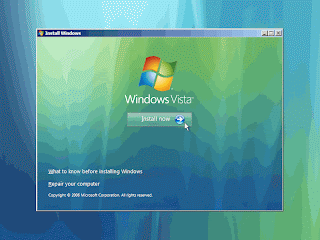
1. After a few moments you will see the first prompt:
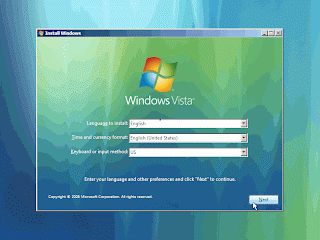


2. Press now the Install button.


3. After a short delay you'll be prompted to enter your product key:
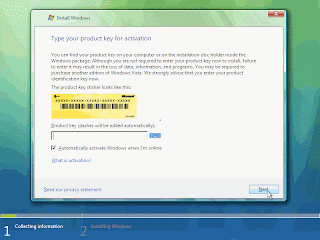


You can skip this part if you don't have the product key handy (read Install Windows Vista Without Supplying the Product Key for more info). However, if you do have a valid product key at that time (and you should have one, we're dealing with legal issues here), then by entering the right key the setup program knows which version of Vista to install.

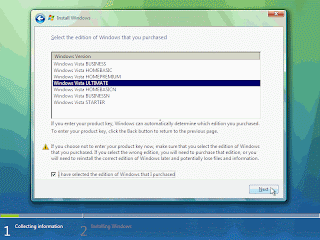
If you skip it, you'll be prompted for a Vista version that matches your product key (the one you don't have handy at that moment):


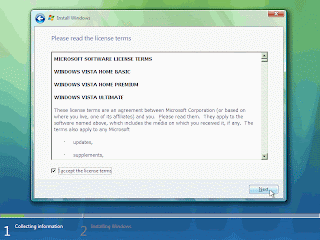
4. You now have to accept the licence terms:


5. Next you need to press the Custom (Advanced) installation type button:
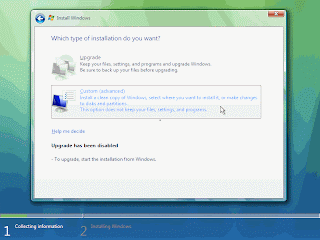


The Upgrade button is disabled because this specific installation if performed on a new computer without any previous operating system on it.

6. The next phase is to pick the installation partition. Since this computer has a new hard disk that hasn't been formatted before, you will only have the option to create a new partition on it. Had it had previous partitions on it you could have chosen to either delete them or perform other tasks. Pressing the Advanced button will bring up the following options.
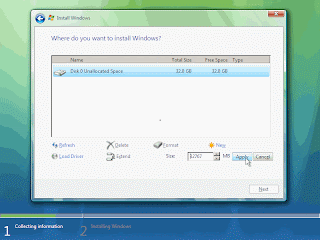


Since we don't need to perform any additional task we will just press on the Next button. The installation process will then create a partition on all the available disk space, and format it.
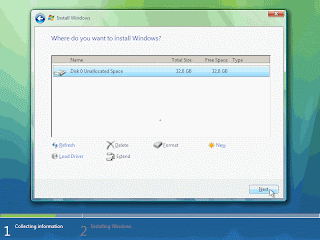


7. The setup process will now begin to copy files from the installation DVD media to the hard disk.
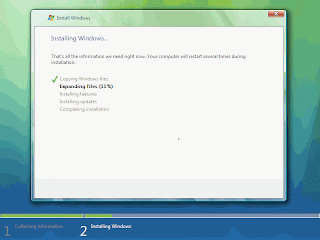


This will take some time:


8. After some time (the exact amount of time will greatly depend on your computer's hardware), the setup process will install updates for the operating system.
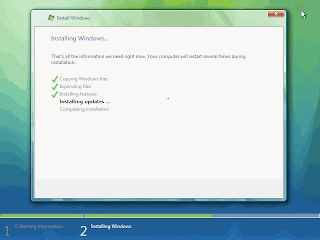


9. The computer will then automatically reboot.
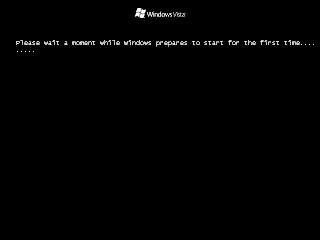


10. Now comes a long waiting period, where the installation process configures the system. Again, the exact amount of time will greatly depend on your computer's hardware.
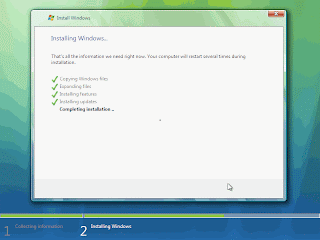


11. After the long wait, the system will then reboot once again.

12. You will think something went wrong because of the relative long time it take the system to display anything besides the black screen, but finally, after a few moments you will note a small colored circle:


13. A few seconds after that you will be prompted to enter a username and password for the first user on the computer.
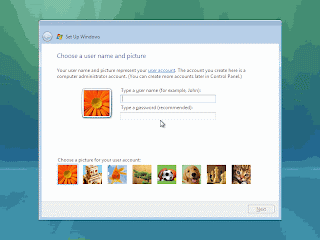


Although the setup program will let you continue without entering a password, note that it is very advisable to enter a password here, and the best option would be to choose a complex password made of at least 7 characters or more (something like P@ssw0rd or MYpa$$w0rd). Make sure you remember it.

Also pick your user's display picture. This can be changed later.

14. Pick a name for your computer. The setup program will create one based upon the username you chose in the previous step, but you can change it now (and later).
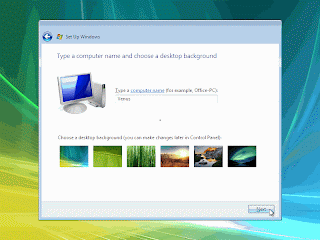


Also pick a background for the user's besktop. This can be changed later.

15. Choose what sort of protection your computer gets. The recommended settings are best for someone that doesn't plan to hide their computer behind a corporate firewall (and even then, in some cases, this would be the best option). If you plan to install a 3rd-party firewall later you can opt to be prompted later.


Note that this setting will also have effect on how the computer uses the Microsoft Windows Update (Automatic Updates) features.

16. Next comes the Time Zone settings window. Choose your location.
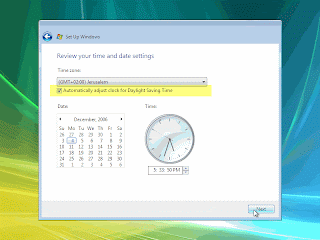


A note for Israeli users: Finally! Windows Vista has the DST setting enabled for us!!!

17. Done! You're prompted with the last setup screen:
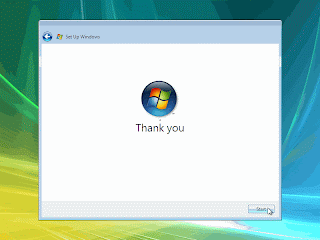


18. Finally, the first screen appears, you're ready to rock and roll!
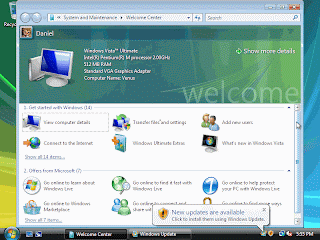


Note that if the computer was connected to the Internet while installing it, it will automatically download and prompt you to install any missing hotfix or update it finds for the current state of the operating system.

Done!

Monday, January 19, 2009

5.2.2 Worksheet: NOS Certification and Jobs

In this worksheet, you will use the Internet, a newspaper, or magazines to gather information
about network operating system certifications and jobs that require these certifications.

1. Use the Internet to research three different network operating system certifications.
Based on your research, complete the table below.

----------------------------------------------------------------------------------

(1)

Network Operating System(s) covered:
---REDHAT

Certification(s) title:
---Red Hat Certified Technician (RHCT)


*Red Hat Certified Technician (RHCT) is a performance-based test that measures actual competence on live systems. RHCT is the first step in establishing Linux credentials and is an ideal certification for those transitioning from non-UNIX/Linux environments.


*Courses/Training required for Certification:

Becoming a Red Hat Certified Technician requires passing a three-hour hands-on exam. There are a couple of different approaches to preparing for the exam depending on your existing level of Linux expertise..


Courses you should take:

>> RH033 Red Hat Linux Essentials

>> RH131 Red Hat System Administration

or

>> RH133 Red Hat Linux Administration (and RHCT Exam)

--------------------------------------------------------------------------------

(2)
Network Operating System(s) covered:
CISCO

Certification(s) title:
Cisco ASA Specialist

Cisco security certifications focus on the growing need for knowledgeable network professionals who can implement complete security solutions. The ASA Specialist certification identifies individuals who possess in-depth expertise with implementing security technologies using the Adaptive Security Appliance (ASA) technologies, especially firewall and VPN functionality. Other topics include ACL, AAA, advanced protocol handling, remote access VPN, secure socket layer VPN, site-to-site VPNs, failover, and security appliance management. Cisco ASA Specialists possess the ability to describe, configure, verify and manage the ASA products and the Adaptive Security Device Manager (ASDM).


Courses/Training required for Certification:

----Cisco ASA Specialist Prerequisites: CCNA Security

Cisco ASA Specialist Exams and Recommended Training

1. Required Exam(s):
a.)642-524 SNAF
b.)642-515 SNAA
2. Recommended Training:
a.)Securing Networks with ASA Foundation
b.)Securing Networks with ASA Advanced

--------------------------------------------------------------------------------

(3)
Network Operating System(s) covered:
MICROSOFT

The Microsoft Certified Systems Engineer (MCSE) credential is the premier certification for professionals who analyze the business requirements and design and implement the infrastructure for business solutions based on the Microsoft Windows 2000 platform and Microsoft Windows Server System. Implementation responsibilities include installing, configuring, and troubleshooting network systems. Learn more about MCSE job functions by reading the MCSE Job Task Analysis (Microsoft Word 925 KB).


Certification(s) title:
Microsoft Certified Systems Engineer (MCSE) Certification

Courses/Training required for Certification:

The Windows 2000 track of the MCSE credential is designed for information technology (IT) professionals working in the typically complex computing environment of medium to large organizations.
An MCSE candidate should have at least one year of experience implementing and administering a network operating system in environments with the following characteristics:
• 200 to 26,000 supported users
• Five to 150 physical locations
• Typical network services and applications including file and print, database, messaging, proxy server or firewall, dial-in server, desktop management, and Web hosting
• Connectivity needs including connecting individual offices and users at remote locations to the corporate network and connecting corporate networks to the Internet

In addition, an MCSE candidate should have at least one year of experience in the following areas:
• Implementing and administering a desktop operating system
• Designing a network infrastructure

For more information on additional requirements to earn the MCSE credential, see the MCSE Certification Requirements.

--------------------------------------------------------------------------------

2. Use the Internet, a newspaper, or a magazine to find at least two network jobs available in your area. Describe the network jobs and the required certifications needed for the position.

A.
COMPANY PROFILE
--Vital Call Center Link (VCC Link) was established in January 2004, and was incorporated to primarily offer contact center solutions to off shore companies to address call center needs: systems and procedure development and set up, supply of quality manpower, provide sales and customer service training. With the increasing demand for qualified call center personnel, VCC Link focuses on training and recruitment to provide clients with a consistent supply of quality manpower as well as efficient sales and customer service training.

American Culture, management and approaching sales and customer service interlock with Filipino best practice telemarketing, sales and customer service. Training solutions customized for project requirement in entry level positions, supervisory management.

--- Technical Support Representative (TSR)

Requirements:

· At least 2nd year college

· Highschool graduates are welcome to apply if they have documented employment

· Candidates must have a basic knowledge in networking and troubleshooting.

· Confident and conversant

· Applicants must be willing to work in any of the following areas: Libis,Commonwealth,Ortigas,Mandaluyong,Makati,Pasig,Taguig,Alabang, & Sucat.Applicants should be Filipino citizens or hold relevant residence status.

· Fresh graduates/Entry level applicants are encouraged to apply.

· Full-Time positions available.

· Required Language(s) : English


B.

--- IT/ NETWORK SPECIALIST

Responsible for providing technical software, hardware and network problem resolution to all employees by performing question/problem diagnosis and guiding users through step-by-step solutions in a help desk environment.


Troubleshoot network computers, printers and maintain backup, database maintenance and other routine systems.


Qualifications:


• Knowledge in Redhat Linux and Unix Operating System

• Active Directory (MS Windows 2003 Server)

• MS ISA 2004 Server

• Background in Local Area Network (LAN)

• PC/Server hardware and software configuration

• SMTP/POP3


Others:


• Experience on MySQL database

• Plone and zope programming

• Python scripting

-The candidate may either be a senior rank and file (1-4 years experience) or a new supervisor with 1-2 years experience in the same capacity.
-He/she can work in a minimum supervision.
-Willing to work in Paranaque.
-This is for a permanent employment.
-Excellent benefit package awaits the right candidate.


Career Level: Middle
Qualification : Degree
Yr(s) Exp: 2 year(s)
Job Category: Information Technology (I.T.) - Application Specialist, Information Technology (I.T.) - System & Network Support, Information Technology (I.T.) - Others
Job Location: NCR - Paranaque City
Salary: Not Specified / Negotiable
Job Type: Full Time, Permanent


3. Which job are you prefer? List reasons for your selection.

: The job that I'll prefer is the --- Technical Support Representative (TSR). why? Because in this Job even you're not a college graduate and you're just familiar in the english language and troubleshooting you can easily apply to this Job.. And you can earn P12,00 to P18,000 salary per month.

2.2.2 Worksheet: Diagnostic Software

1. Based on your research, list at least two different hard drive manufacturers.

*Samsung
*Toshiba Notebook


2. Based on your research, choose a hard drive manufacturer. Does this manufacturer offer hard drive diagnostic software to go with their products? If so, list the name and the features of the diagnostic software.

Manufacturer: IBM / Hitachi, Ltd.


Software Name: OGT Diagnostic Tool v9.o


File Name: setupOGT900.exe


File Size: 3.89 MB


Version: 9.0


Publish Date: November 25, 2004


Description: The OGT Diagnostic tool is an failure analysis tool.

Wednesday, January 14, 2009

HARDWARE, SOFTWARE & INSTALLATION PROCEDURE FOR WINDOWS XP

::LATEST PROCESSORS::


::1.1 DESKTOPS::


-Intel® Core™ i7 Processor Extreme Edition -


Conquer the world of extreme gaming with the fastest performing processor on the planet: the Intel® Core™ i7 processor Extreme Edition.¹ With faster, intelligent multi-core technology that accelerates performance to match your workload, it delivers an incredible breakthrough in gaming performance.

But performance doesn't stop at gaming. You'll multitask 25 percent faster and unleash incredible digital media creation with up to 79 percent faster video encoding and up to 46 percent faster image rendering, plus incredible performance for photo retouching and editing.¹

In fact, you'll experience maximum performance for whatever you do, thanks to the combination of Intel® Turbo Boost technology² and Intel® Hyper-Threading technology (Intel® HT technology)³, which activates full processing power exactly where and when you need it most.


Product information
-3.20 GHz core speed
-8 processing threads with Intel® HT technology
-8 MB of Intel® Smart Cache
-3 Channels of DDR3 1066 MHz memory


::1.2 SERVERS::


::Intel® Xeon® Processor 7000 Sequence::


The Intel® Xeon® processor 7400 series, offers the industry's highest virtualization performance so you can do more with less. With key platform innovations built-in, the Intel® Xeon® processor 7400 series offers more headroom, reliability, and the highest expandability for large-scale server consolidation.


Product information

-Intel® Xeon® processor 7400 series
-Hardware-assisted virtualization technology
-Up to16 MB, shared L3 cache
-Intel® 64 architecture²
-Enhanced reliability and manageability


::1.3 NOTEBOOK/LAPTOP::


::Intel® Centrino® 2 with vPro™ Technology::

Keep your workforce more secure, managed, and mobile. With security and manageability built right onto the chip, Intel® Centrino® 2 with vPro™ technology provides hardware-assisted remote isolation, diagnostics, and repair, so you can manage your mobile workforce remotely, even if the system's OS is unresponsive.¹ And with exceptional dual-core performance, 5X better wireless performanceΩ and the longest possible battery life.²

Now you can also get notebooks with Intel Centrino 2 with vPro technology in astonishingly thin and light packages. As the smallest version of Intel® Centrino® processor technology yet-50 percent smaller-you're most mobile workforce can enjoy the sleekest full-featured and performance packed notebooks³ along with improved energy efficiency and power savings.°


Product information
-Best for business, providing state-of-the-art threat protection against security threats enabled by hardware defense filters and agent presence checking.Φ

-Mobile performance. Providing the next level of mobile performance,Δ new Intel Centrino 2 with vPro technology is designed for today's needs, future 64-bit applications,² and next-generation multithreaded software.

-Increased energy-efficiency. Built on the latest 45nm Intel® Core™ microarchitecture, Intel Centrino 2 with vPro technology provides industry-leading,² energy-efficient performance.

-Longer battery life. Based on next-generation hafnium-based 45nm technology, Intel Centrino 2 with vPro technology offers unique energy-saving components designed to give you the longest possible battery life.

-Faster, more predictable wireless. Experience up to 5x faster connectivity speeds with 802.11n wireless technology improving reliability while decreasing connection loss.Ω

-Manage your mobile workforce wirelessly. Remotely diagnose, isolate, and repair infected notebooks using hardware-based remote manageability features that work even if notebooks are off or the OS is unresponsive.¹

-Broad industry support from leading manageability and security software providers like Symantec, LANDesk, HP, Microsoft, and Cisco.

-Reduce maintenance costs and stay compliant. Provide routine patching and maintenance ensuring that you're only paying software license fees for what you're using while keeping your licenses up-to-date.¹

-Get the most out of graphics-intensive Windows Vista*. Powerful Intel® Graphics allow you to run Windows Vista with full Aero* support-without the expense of an additional graphics card.²


::1.4 EXPANSION SLOTS::


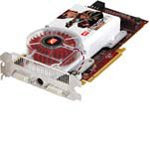
::ATI Radeon X1900 GT 256MB PCI Expresss::

PCI Exp, 256GB Video RAM, Radeon X1900 Chipset, Dual DVI, TV-Out

Is your rig ready for the onslaught of next generation games? It will be with the Radeon X1900—the fastest consumer 3D graphics processor on the planet. Designed from the ground up to deliver maximum graphical detail at the best possible frame rates, the Radeon X1900’s state-of-the-art architecture...


::SOFTWARE::

-LATEST OPERATING SYSTEM FROM MICROSOFT-


::WINDOWS 7::

Windows 7 (formerly codenamed Blackcomb and Vienna) is the next release of Microsoft Windows, an operating system produced by Microsoft for use on personal computers, including home and business desktops, laptops, Tablet PCs, and media center PCs.

Microsoft stated in 2007 that it is planning Windows 7 development for a three-year time frame starting after the release of its predecessor, Windows Vista, but that the final release date will be determined by product quality.

Unlike its predecessor, Windows 7 is intended to be an incremental upgrade with the goal of being fully compatible with existing device drivers, applications, and hardware. Presentations given by the company in 2008 have focused on multi-touch support, a redesigned Windows Shell with a new taskbar, a home networking system called HomeGroup, and performance improvements. Some applications that have been included with prior releases of Microsoft Windows, most notably Windows Mail, Windows Calendar,[citation needed] Windows Movie Maker, and Windows Photo Gallery, are no longer included with the operating system; they are instead offered separately (free of charge) as part of the Windows Live Essentials suite.


-LATEST OPERATING SYSTEM FROM SUN MICTOSYSTEMS-

::SOLARIS OPERATING SYSTEM::


The Solaris Operating System—supported on over 1000 x86 and SPARC platforms—delivers the performance, stability and security your users and customers demand. With more applications available than for any other open operating system, one OS can span your entire enterprise: the Web tier, the data warehouse, and the most demanding technical compute applications. Moving to Solaris 10 is easy, whether you're upgrading from an older Solaris release or migrating from another OS.


-LATEST OPERATING SYSTEM FROM UNIX/LINUX-


::UBUNTU OPERATING SYSTEM::

Linux-based operating system that is perfect for laptops, desktops and servers. It contains all the applications you need - a web browser, presentation, document and spreadsheet software, instant messaging and much more.


II. INSTALLATION PROCEDURES OF WINDOWS XP::


Step 1 - Start your PC and place your Windows XP CD in your CD/DVD-ROM drive. Your PC should automatically detect the CD and you will get a message saying "Press any key to boot from CD".

Step 2 - At this stage it will ask you to press F6 if you want to install a third party Raid or SCSI driver. If you are using a an IDE Hard Drive then you do not need to press F6. If you are using a SCSI or SATA Hard drive then you must press F6 otherwise Windows will not detect your Hard Drive during the installation. Please make sure you have the Raid drivers on a floppy disk. Normally the drivers are supplied on a CD which you can copy to a floppy disk ready to be installed. If you are not sure how to do this then please read your motherboard manuals for more information.

Step 3 - Press S to Specify that you want to install additional device.

Step 4 - You will be asked to insert the floppy disk with the Raid or SCSI drivers. Press enter after you have inserted the disk.

Step 5 - You will see a list of Raid drivers for your HDD. Select the correct driver for your device and press enter.

Step 6 - You will then get a Windows XP Professional Setup screen. You have the option to do a new Windows install, Repair previous install or quit. Since we are doing a new install we just press Enter to continue.

Step 7 - You will be presented with the End User Licensing Agreement. Press F8 to accept and continue

Step 8 - This step is very important. Here we will create the partition where Windows will be installed. If you have a brand new unformatted drive you will get a screen similar to below. In our case the drive size is 8190MB. We can choose to install Windows in this drive without creating a partition, hence use the entire size of the drive. If you wish to do this you can just press enter and Windows will automatically partition and format the drive as one large drive.

However for this demonstration I will create two partition. The first partition will be 6000MB (C: drive) and second partition would be 2180MB (E: drive). By creating two partition we can have one which stores Windows and Applications and the other which stores our data. So in the future if anything goes wrong with our Windows install such as virus or spyware we can re-install Windows on C: drive and our data on E: drive will not be touched. Please note you can choose whatever size partition your like. For example if you have 500GB hard drive you can have two partition of 250GB each.
Press C to create a partition.

Step 9 - Windows will show the total size of the hard drive and ask you how much you want to allocate for the partition you are about to create. I will choose 6000MB. You will then get the screen below. Notice it shows C: Partition 1 followed by the size 6000 MB. This indicates the partition has been created. We still have an unpartitioned space of 2189MB. Next heighlight the unpartitioned space by pressing down the arrow key. Then press C to create another partition. You will see the total space available for the new partition. Just choose all the space left over, in our case 2180MB.

Step 10 - Now you will see both partition listed. Partition 1 (C: Drive) 6000MB and Partition 2 (E: Drive) 2180MB. You will also have 8MB of unpartitioned space. Don't worry about that. Just leave it how its is. Windows normally has some unpartitioned space. You might wonder what happened to D: drive. Windows has automatically allocated D: drive to CD/DVD-ROM.
Select Partition 1 (C: Drive) and press Enter.

Step 11 - Choose format the partition using NTFS file system.This is the recommended file system. If the hard drive has been formatted before then you can choose quick NTFS format. We chose NTFS because it offers many security features, supports larger drive size, and bigger size files.

Step 12 - After the setup has completed copying the files the computer will restart. Leave the XP CD in the drive but this time DO NOT press any key when the message "Press any key to boot from CD" is displayed. In few seconds setup will continue. Windows XP Setup wizard will guide you through the setup process of gathering information about your computer.

Step 13 - Choose your region and language.

Step 14 - Type in your name and organization.

Step 15. Enter your product key.

Step 16 - Name the computer, and enter an Administrator password. Don't forget to write down your Administrator password.

Step 17 - Enter the correct date, time and choose your time zone.

Step 18 - For the network setting choose typical and press next.

Step 19 - Choose workgroup or domain name. If you are not a member of a domain then leave the default settings and press next. Windows will restart again and adjust the display.

Step 20 - Finally Windows will start and present you with a Welcome screen. Click next to continue.

Step 21 - Choose 'help protect my PC by turning on automatic updates now' and press next.

Step 22 - Will this computer connect to the internet directly, or through a network? If you are connected to a router or LAN then choose: 'Yes, this computer will connect through a local area network or home network'. If you have dial up modem choose: 'No, this computer will connect directly to the internet'. Then click Next.

Step 23 - Ready to activate Windows? Choose yes if you wish to active Windows over the internet now. Choose no if you want to activate Windows at a later stage.

Step 24 - Add users that will sign on to this computer and click next.

Step 25 - You will get a Thank you screen to confirm setup is complete. Click finish.

Step 26. Log in, to your PC for the first time.

Step 27 - You now need to check the device manager to confirm that all the drivers has been loaded or if there are any conflicts. From the start menu select Start -> Settings -> Control Panel. Click on the System icon and then from the System Properties window select the Hardware tab, then click on Device Manager.

If there are any yellow exclamation mark "!" next to any of the listed device, it means that no drivers or incorrect drivers has been loaded for that device. In our case we have a Video Controller (VGA card) which has no drivers installed.

Your hardware should come with manufacturer supplied drivers. You need to install these drivers using the automatic setup program provided by the manufacturer or you need to manually install these drivers. If you do not have the drivers, check the manufacturers website to download them.

To install a driver manually use the following procedure:

(a) From the device manager double click on the device containing the exclamation mark.

(b) This would open a device properties window.

(c) Click on the Driver tab.

(d) Click Update Driver button.

You now get two options. The first option provides an automatic search for the required driver. The second option allows you to specify the location of the driver. If you don't know the location of the driver choose the automatic search which would find the required driver from the manufacturer supplied CD or Floppy disk. Windows would install the required driver and may ask you to restart the system for the changes to take affect. Use this procedure to install drivers for all the devices that contain an exclamation mark. Windows is completely setup when there are no more exclamation marks in the device manager.