::1.1 DESKTOPS::

-Intel® Core™ i7 Processor Extreme Edition -
Conquer the world of extreme gaming with the fastest performing processor on the planet: the Intel® Core™ i7 processor Extreme Edition.¹ With faster, intelligent multi-core technology that accelerates performance to match your workload, it delivers an incredible breakthrough in gaming performance.
But performance doesn't stop at gaming. You'll multitask 25 percent faster and unleash incredible digital media creation with up to 79 percent faster video encoding and up to 46 percent faster image rendering, plus incredible performance for photo retouching and editing.¹
In fact, you'll experience maximum performance for whatever you do, thanks to the combination of Intel® Turbo Boost technology² and Intel® Hyper-Threading technology (Intel® HT technology)³, which activates full processing power exactly where and when you need it most.
Product information
-3.20 GHz core speed
-8 processing threads with Intel® HT technology
-8 MB of Intel® Smart Cache
-3 Channels of DDR3 1066 MHz memory
::1.2 SERVERS::

::Intel® Xeon® Processor 7000 Sequence::
The Intel® Xeon® processor 7400 series, offers the industry's highest virtualization performance so you can do more with less. With key platform innovations built-in, the Intel® Xeon® processor 7400 series offers more headroom, reliability, and the highest expandability for large-scale server consolidation.
Product information
-Intel® Xeon® processor 7400 series
-Hardware-assisted virtualization technology
-Up to16 MB, shared L3 cache
-Intel® 64 architecture²
-Enhanced reliability and manageability
::1.3 NOTEBOOK/LAPTOP::

::Intel® Centrino® 2 with vPro™ Technology::
Keep your workforce more secure, managed, and mobile. With security and manageability built right onto the chip, Intel® Centrino® 2 with vPro™ technology provides hardware-assisted remote isolation, diagnostics, and repair, so you can manage your mobile workforce remotely, even if the system's OS is unresponsive.¹ And with exceptional dual-core performance, 5X better wireless performanceΩ and the longest possible battery life.²
Now you can also get notebooks with Intel Centrino 2 with vPro technology in astonishingly thin and light packages. As the smallest version of Intel® Centrino® processor technology yet-50 percent smaller-you're most mobile workforce can enjoy the sleekest full-featured and performance packed notebooks³ along with improved energy efficiency and power savings.°
Product information
-Best for business, providing state-of-the-art threat protection against security threats enabled by hardware defense filters and agent presence checking.Φ
-Mobile performance. Providing the next level of mobile performance,Δ new Intel Centrino 2 with vPro technology is designed for today's needs, future 64-bit applications,² and next-generation multithreaded software.
-Increased energy-efficiency. Built on the latest 45nm Intel® Core™ microarchitecture, Intel Centrino 2 with vPro technology provides industry-leading,² energy-efficient performance.
-Longer battery life. Based on next-generation hafnium-based 45nm technology, Intel Centrino 2 with vPro technology offers unique energy-saving components designed to give you the longest possible battery life.
-Faster, more predictable wireless. Experience up to 5x faster connectivity speeds with 802.11n wireless technology improving reliability while decreasing connection loss.Ω
-Manage your mobile workforce wirelessly. Remotely diagnose, isolate, and repair infected notebooks using hardware-based remote manageability features that work even if notebooks are off or the OS is unresponsive.¹
-Broad industry support from leading manageability and security software providers like Symantec, LANDesk, HP, Microsoft, and Cisco.
-Reduce maintenance costs and stay compliant. Provide routine patching and maintenance ensuring that you're only paying software license fees for what you're using while keeping your licenses up-to-date.¹
-Get the most out of graphics-intensive Windows Vista*. Powerful Intel® Graphics allow you to run Windows Vista with full Aero* support-without the expense of an additional graphics card.²
::1.4 EXPANSION SLOTS::

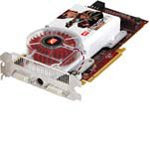
::ATI Radeon X1900 GT 256MB PCI Expresss::
PCI Exp, 256GB Video RAM, Radeon X1900 Chipset, Dual DVI, TV-Out
Is your rig ready for the onslaught of next generation games? It will be with the Radeon X1900—the fastest consumer 3D graphics processor on the planet. Designed from the ground up to deliver maximum graphical detail at the best possible frame rates, the Radeon X1900’s state-of-the-art architecture...
::SOFTWARE::
-LATEST OPERATING SYSTEM FROM MICROSOFT-

::WINDOWS 7::
Windows 7 (formerly codenamed Blackcomb and Vienna) is the next release of Microsoft Windows, an operating system produced by Microsoft for use on personal computers, including home and business desktops, laptops, Tablet PCs, and media center PCs.
Microsoft stated in 2007 that it is planning Windows 7 development for a three-year time frame starting after the release of its predecessor, Windows Vista, but that the final release date will be determined by product quality.
Unlike its predecessor, Windows 7 is intended to be an incremental upgrade with the goal of being fully compatible with existing device drivers, applications, and hardware. Presentations given by the company in 2008 have focused on multi-touch support, a redesigned Windows Shell with a new taskbar, a home networking system called HomeGroup, and performance improvements. Some applications that have been included with prior releases of Microsoft Windows, most notably Windows Mail, Windows Calendar,[citation needed] Windows Movie Maker, and Windows Photo Gallery, are no longer included with the operating system; they are instead offered separately (free of charge) as part of the Windows Live Essentials suite.
-LATEST OPERATING SYSTEM FROM SUN MICTOSYSTEMS-
::SOLARIS OPERATING SYSTEM::

The Solaris Operating System—supported on over 1000 x86 and SPARC platforms—delivers the performance, stability and security your users and customers demand. With more applications available than for any other open operating system, one OS can span your entire enterprise: the Web tier, the data warehouse, and the most demanding technical compute applications. Moving to Solaris 10 is easy, whether you're upgrading from an older Solaris release or migrating from another OS.
-LATEST OPERATING SYSTEM FROM UNIX/LINUX-

::UBUNTU OPERATING SYSTEM::
Linux-based operating system that is perfect for laptops, desktops and servers. It contains all the applications you need - a web browser, presentation, document and spreadsheet software, instant messaging and much more.
II. INSTALLATION PROCEDURES OF WINDOWS XP::
Step 1 - Start your PC and place your Windows XP CD in your CD/DVD-ROM drive. Your PC should automatically detect the CD and you will get a message saying "Press any key to boot from CD".
Step 2 - At this stage it will ask you to press F6 if you want to install a third party Raid or SCSI driver. If you are using a an IDE Hard Drive then you do not need to press F6. If you are using a SCSI or SATA Hard drive then you must press F6 otherwise Windows will not detect your Hard Drive during the installation. Please make sure you have the Raid drivers on a floppy disk. Normally the drivers are supplied on a CD which you can copy to a floppy disk ready to be installed. If you are not sure how to do this then please read your motherboard manuals for more information.
Step 3 - Press S to Specify that you want to install additional device.
Step 4 - You will be asked to insert the floppy disk with the Raid or SCSI drivers. Press enter after you have inserted the disk.
Step 5 - You will see a list of Raid drivers for your HDD. Select the correct driver for your device and press enter.
Step 6 - You will then get a Windows XP Professional Setup screen. You have the option to do a new Windows install, Repair previous install or quit. Since we are doing a new install we just press Enter to continue.
Step 7 - You will be presented with the End User Licensing Agreement. Press F8 to accept and continue
Step 8 - This step is very important. Here we will create the partition where Windows will be installed. If you have a brand new unformatted drive you will get a screen similar to below. In our case the drive size is 8190MB. We can choose to install Windows in this drive without creating a partition, hence use the entire size of the drive. If you wish to do this you can just press enter and Windows will automatically partition and format the drive as one large drive.
However for this demonstration I will create two partition. The first partition will be 6000MB (C: drive) and second partition would be 2180MB (E: drive). By creating two partition we can have one which stores Windows and Applications and the other which stores our data. So in the future if anything goes wrong with our Windows install such as virus or spyware we can re-install Windows on C: drive and our data on E: drive will not be touched. Please note you can choose whatever size partition your like. For example if you have 500GB hard drive you can have two partition of 250GB each.
Press C to create a partition.
Step 9 - Windows will show the total size of the hard drive and ask you how much you want to allocate for the partition you are about to create. I will choose 6000MB. You will then get the screen below. Notice it shows C: Partition 1 followed by the size 6000 MB. This indicates the partition has been created. We still have an unpartitioned space of 2189MB. Next heighlight the unpartitioned space by pressing down the arrow key. Then press C to create another partition. You will see the total space available for the new partition. Just choose all the space left over, in our case 2180MB.
Step 10 - Now you will see both partition listed. Partition 1 (C: Drive) 6000MB and Partition 2 (E: Drive) 2180MB. You will also have 8MB of unpartitioned space. Don't worry about that. Just leave it how its is. Windows normally has some unpartitioned space. You might wonder what happened to D: drive. Windows has automatically allocated D: drive to CD/DVD-ROM.
Select Partition 1 (C: Drive) and press Enter.
Step 11 - Choose format the partition using NTFS file system.This is the recommended file system. If the hard drive has been formatted before then you can choose quick NTFS format. We chose NTFS because it offers many security features, supports larger drive size, and bigger size files.
Step 12 - After the setup has completed copying the files the computer will restart. Leave the XP CD in the drive but this time DO NOT press any key when the message "Press any key to boot from CD" is displayed. In few seconds setup will continue. Windows XP Setup wizard will guide you through the setup process of gathering information about your computer.
Step 13 - Choose your region and language.
Step 14 - Type in your name and organization.
Step 15. Enter your product key.
Step 16 - Name the computer, and enter an Administrator password. Don't forget to write down your Administrator password.
Step 17 - Enter the correct date, time and choose your time zone.
Step 18 - For the network setting choose typical and press next.
Step 19 - Choose workgroup or domain name. If you are not a member of a domain then leave the default settings and press next. Windows will restart again and adjust the display.
Step 20 - Finally Windows will start and present you with a Welcome screen. Click next to continue.
Step 21 - Choose 'help protect my PC by turning on automatic updates now' and press next.
Step 22 - Will this computer connect to the internet directly, or through a network? If you are connected to a router or LAN then choose: 'Yes, this computer will connect through a local area network or home network'. If you have dial up modem choose: 'No, this computer will connect directly to the internet'. Then click Next.
Step 23 - Ready to activate Windows? Choose yes if you wish to active Windows over the internet now. Choose no if you want to activate Windows at a later stage.
Step 24 - Add users that will sign on to this computer and click next.
Step 25 - You will get a Thank you screen to confirm setup is complete. Click finish.
Step 26. Log in, to your PC for the first time.
Step 27 - You now need to check the device manager to confirm that all the drivers has been loaded or if there are any conflicts. From the start menu select Start -> Settings -> Control Panel. Click on the System icon and then from the System Properties window select the Hardware tab, then click on Device Manager.
If there are any yellow exclamation mark "!" next to any of the listed device, it means that no drivers or incorrect drivers has been loaded for that device. In our case we have a Video Controller (VGA card) which has no drivers installed.
Your hardware should come with manufacturer supplied drivers. You need to install these drivers using the automatic setup program provided by the manufacturer or you need to manually install these drivers. If you do not have the drivers, check the manufacturers website to download them.
To install a driver manually use the following procedure:
(a) From the device manager double click on the device containing the exclamation mark.
(b) This would open a device properties window.
(c) Click on the Driver tab.
(d) Click Update Driver button.
You now get two options. The first option provides an automatic search for the required driver. The second option allows you to specify the location of the driver. If you don't know the location of the driver choose the automatic search which would find the required driver from the manufacturer supplied CD or Floppy disk. Windows would install the required driver and may ask you to restart the system for the changes to take affect. Use this procedure to install drivers for all the devices that contain an exclamation mark. Windows is completely setup when there are no more exclamation marks in the device manager.
+olwEyz019.jpg)
No comments:
Post a Comment